Dry chicken is the worst!
It’s hard to chew, it’s hard to swallow, and it’s hard to eat chicken again after you’ve had it so dry. It’s such a difficult food to cook, with seemingly seconds between raw, perfect, and overdone, leaving a wide range of cooks with dried out messes for dinners and plenty of uneaten chicken breast going rancid in the fridge.
How do you cook it so it’s still juicy yet not raw? Well, start by reading what the professionals have to say about it. Following a simple cooking method can ensure that you get deliciously juicy chicken breasts every time you cook chicken (1)!
Make Chicken like a Master Chef
This cooking method is intended to be used on skinless, boneless chicken breasts (2). That being said, chicken breasts with skin and bones tend to be a lot juicier to begin with, as the skin and bones are there to help keep the meat moist. So basically, you can use either boneless or boned chicken, and remember that if you’re not a fan of the skin, you can always remove it after it’s been cooked (2).
Step One: Brine Your Chicken
While this step isn’t absolutely necessary for a nicely cooked chicken breast, it works wonders in making your chicken much juicier. Since it only takes about fifteen minutes to complete, there’s really no reason not to do it. Here is a quick brine recipe (3):
Dissolve 4 tablespoons of salt in 4 cups of water
Lay the chicken breast in a deep dish
Get your Free copy of The Bacon & Butter Cookbook
This free cookbook is jampacked with 148 delicious ketogenic recipes that will help you burn fat like crazy!
Pour the brine over the breasts, so that they are completely submerged
Let them sit (anywhere from 15 minutes to 4 hours, it’s up to you!)
Remove the brine and dry the chicken before continuing
Step Two: Pound the Chicken!
A big problem that cooks find with chicken is that while the outside is completely cooked, the inside is still pink and raw. You can handle this dilemma by making the chicken all the same thickness (1)! If you don’t happen to have a rubber mallet, then using a simple jar of pickles (or jam or tomatoes) could be an easy substitute. Start by laying out a piece of plastic wrap, lay one breast on it, and then fold plastic over the top of the breast so it’s completely covered. Then, pound out your chicken so it’s flat and will cook evenly.
Step Three: Season Your Meat!
Bland chicken is often the result of poor seasoning, so don’t make that mistake! Salt and pepper are great ways to make for flavorful chicken. Feel free to add in some herbs, garlic, or other seasonings of your preference (some people enjoy a good crunch, so you can dry dipping your chicken in some flour for a slight bread coating).
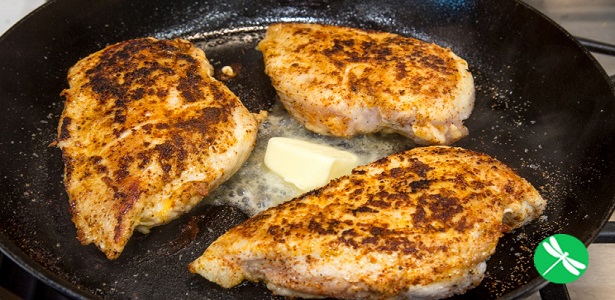
Step Four: Heat Up Some Oil in Your Pan
You want your pan ready for cooking before your chicken ever touches it.Make sure you have a tight fitting lid and then heat up about a tablespoon of oil or butter. To test the heat, you can lay a corner of your chicken in the pan. If it doesn’t sizzle, then it’s not hot enough and you need to heat it longer.
Step Five: Start Cooking
Once your oil is hot enough, it’s time to start cooking your chicken. You can turn the heat down to medium before laying your chicken breast down flat in the pan. Cook it for a whole minute without ever moving the chicken (1). If you’ve chosen to use flour, then cook your chicken without moving it until the flour is slightly golden before moving to step six.
Step Six: Flip, Cover, and Cook–and don’t touch!
After the minute has passed, or your flour is golden, flip your meat. Immediately turn the heat down to low, cover the pan with the tight-fitted lid, and wait. DO NOT TOUCH IT (1). Don’t peek at the chicken, don’t move it from the heat, just let it cook. Let the stove do all the work for a good 8-10 minutes (1).
Step Seven: Remove From Heat and Turn Off the Stove
Don’t remove the lid, but turn off your burner and remove the pan from the heat–only after waiting 10, peeking-less minutes. Reset your timer for another ten minutes and wait again.
Step Eight: Enjoy!
You’ve been patiently waiting for 20 excruciating minutes, and now it’s time to let all your hard work pay off. Remove the lid and check to be sure that your chicken is cooked with a meat thermometer (it should read at least 165*F) (1). Now, enjoy your delicious meal.
Ready, Set, GO!
Chicken can be intimidating, but once you’ve mastered a few techniques, you’ll be able to create some delicious results time and time again. Give it a shot!